|
|
 Creating photographic panoramas with PhotoVista
Building the panorama with PhotoVista
By Mike Slocombe for Internet Magazine, June 2004
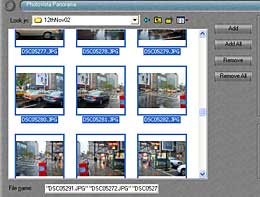 1. Import the images
Open up Photovista, and then click on the 'My Computer' icon at the bottom of the interface.
Navigate to the folder that contains your images and shift-click to select the photos that are going to make up your panorama.
Click 'add' button when you're finished (you can also drag and drop the files straight into program's interface.)
2. Sort 'em out
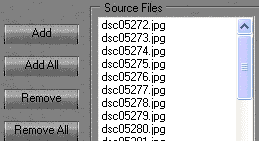 Rearrange the order of the images by dragging the files into the right position in the dialog window, or clicking the 'sort' button to put them in alphabetical/numerical order.
The program automatically defaults to create a 3D panorama, but if you just want a long flat image, select the '2D' option from the drop down box.
3. Select your lens
 The main program interface displays the images in the order you've specified but before PhotoVista can work its all-stitchin' magic, it needs to know what lens type you used.
Select 'image' -> 'select lens' and you'll be presented with a comprehensive list of different lens and digital cameras with an option to download new definitions from their site.
Tick off your camera/lens and press 'OK'

4. Customise the lens
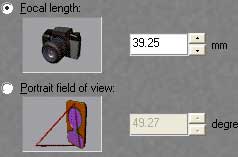 If your camera set up doesn't appear on the list, all is not lost!
PhotoVista has a clever tool to allow users to create new lenses, with precise control over the focal length and horizontal/vertical fields of view.
If it all looks a bit too techie for you, try going back and selecting a camera model similar to yours - it'll probably work fine.
5. Get ready for some stitchin'
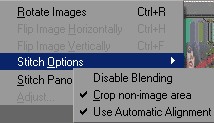 Once you've selected your lens size, you can begin the stitching process.
By default, the program will automatically align and blend the images and crop out any blank areas, although you can turn off these options via the 'image' menu.
Because the stitch process is quite processor intensive, we recommend using the 'preview' button first to see a low res version of how the panorama will look.
6. Tweaking the panorama
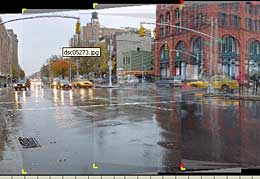 PhotoVista does a pretty good job of second guessing what a scene is supposed to look like, but sometimes it gets a bit confused.
If your preview is a bit wonky, you can shuffle the alignment of the images around in the main window (press CTRL-A to zoom in).
When you're happy with the new alignment, bash the 'stitch image' button and wait for the program to do its stuff.
This may take a little while, so be patient!
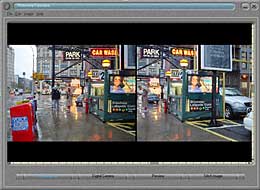
7. Viewing the finished panorama
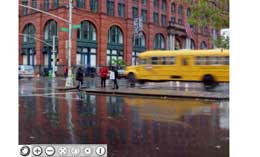 Once the panorama is finished, you'll automatically be presented with a flat version of the entire image in the 'stitched result' window. Once the panorama is finished, you'll automatically be presented with a flat version of the entire image in the 'stitched result' window.
You can then click on 'show in 3D viewer' or 'show in browser' to see how it'll look on your website.
8. It's a wrap
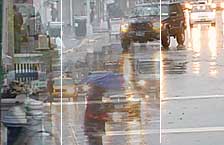 If you're not happy with the way that PhotoVista has joined the two ends of your panorama together, use the 'panorama' -> 'adjust manually' tool to correct any mistakes.
This lets you precisely match up the two ends of the panorama.
Once you're happy with the new position, press OK to see the amended wraparound in the stitched result window,
9. Saving the panorama
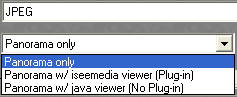 The finished panorama can now be published directly to a web server or exported for use on your web page.
Photovista can generate the java files necessary for viewing the files on the web, or produce a version which uses their proprietary browser plug-in.
Choose 'save panorama as' and select your compression options by ticking your preferred image quality/file size (unfortunately, there's no preview of image size)
|
